Worksheet Crafter User Manual
|
The Table Item allows you to create tables with a variable number of rows and columns. Borders and background colors are editable on a per cell basis.
|
Creating a Table Item
|
Use the Item Toolbar button shown on the left to place a new table in the worksheet. There are two ways to create the item:
1.Drag the item from the item toolbar onto the worksheet and drop it at the desired position. The table is created with the number of rows and columns displayed in the item toolbar. E.g. for "2×3" this will be two rows and three columns.
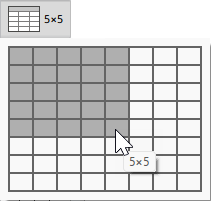
2.Click the button. A size selection window opens. Move the mouse over the grid to change the number of rows and columns and confirm with another left click. Click again into the worksheet to create the table.
Of course you can add or remove rows or columns later on.
For more information consult chapter "Creating Items".
|
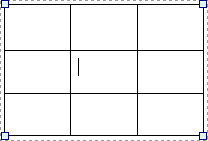
After creating the table you start directly in edit mode. The text cursor is in the first cell and you can start typing.
Also in edit mode, the toolbar is available and cell sizes may be changed. More on that later.
You leave edit mode by hitting "Esc" or clicking somewhere else in the worksheet.
To go back to editing, simply double click on the desired cell.
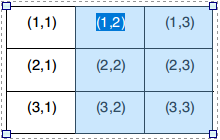
Many actions can be applied to multiple cells at once. To select multiple cells, hold the left mouse button and drag open a selection rectangle. The selected cells are highlighted in grey. To multi-select make sure you are in edit mode first.

Most Text Formatting, e.g. selecting the font, can be applied to a multi-selection.
This is also true for the table toolbar and the property editor as well as cut, copy and paste actions (more on that below).
Editing Text
In edit mode you can edit the text. The text cursor shows your current position. Use the tabulator key to jump to the next cell ("Shift+Tabulator" for the previous one). Movement with the arrow keys is also possible.
As in the text item you can change the text formatting.
The table supports spell checking.
The cell width stays fixed when you enter text. Text will automatically wrap at the cell border. The line height increases automatically, so the text always fits into the cell.
When you delete text the line height stays constant. You can set it to the minimum by double clicking on the lower cell border. The column width can be minimized by double clicking on the border to the right of the column. This will not increase the width, even if there is word-wrapping inside some of the cells.
In edit mode you can adjust the row height or column width manually. Move the mouse over the cell border until it is highlighted:
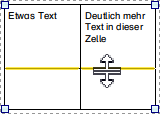
Now, while you hold down the left mouse button, you can drag the border to the desired position.
The movement is limited by the minimum cell size. If the movement is restricted, the restricting cell is highlighted red:
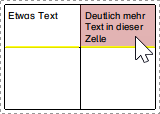
Cut, copy and paste commands are available in the "Edit" menu or the context menu. To open the context menu, right click on the selection. Keyboard shortcuts are available as well:
•Cut: CTRL+X (CMD+X on Mac)
•Copy: CTRL+C (CMD+C on Mac)
•Paste: CTRL+V (CMD+V on Mac)
The action will take over text including the text formatting (font, font size, bold, etc.). Other properties like background color or borders are ignored.
To copy or paste there are two options:
•Select text inside a cell. The selected text will be cut or copied.
•Select multiple cells. The whole text of the selected cells will be cut or copied.
On paste as much as possible will be inserted from the clipboard without adding new rows or columns.
Exception: You set the text cursor into a single non-empty cell or make a partial text selection inside a single cell. The text will be inserted at your selection. If you have multiple cells in your clipboard, the text of the upper left copied cell will be pasted.
You can copy and paste between different tables or tables and text items as well.
Example:
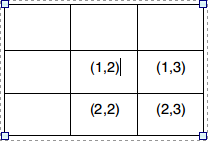
1. Copy cell selection |
2. Text cursor in other table |
3. Insert cell selection |
|
|
|
Toolbar
In edit mode a toolbar is shown above the table:

Edit Frame
The first toolbar row allows you to edit the table frame. First select the cells for which you want to edit the frame. The changes always apply to the currently selected cells or the cell with the blinking text cursor.
Select the desired line type, line thickness and line color. Select in the dropdown menu for which frame lines the settings should be applied:
|
Apply frame to all frame sections of the selection |
|
Remove frame from all frame sections of the selection (frame settings are irrelevant in this case) |
|
Apply frame to the outer frame sections of the selection |
|
Apply frame to the upper outer frame sections of the selection |
|
Apply frame to the lower outer frame sections of the selection |
|
Apply frame to the left outer frame sections of the selection |
|
Apply frame to the right outer frame sections of the selection |
|
Apply frame to the all inner frame sections of the selection |
|
Apply frame to the all horizontal inner frame sections of the selection |
|
Apply frame to the all vertical inner frame sections of the selection |
Click on "apply now" to apply the changes to the current cell selection.
Edit Background Color
The setting for the background color is found in the lower right of the toolbar. It applies to the current cell selection.
Insert Rows/Columns
In the second toolbar row you can insert new rows or columns:
|
Insert rows above the current selection |
|
Insert rows below the current selection |
|
Insert columns to the left of the current selection |
|
Insert columns to the right of the current selection |
To insert multiple rows or columns at once, select the number of rows or columns to be inserted, before clicking the button.
E.g. if you select two cells vertically and then insert rows, two new rows will be inserted.
Deleting Rows/Columns
To delete rows or columns, select them in the table and click the corresponding toolbar button:
|
Delete selected rows |
|
Delete selected columns |
You do not need to select the whole row or column. It is sufficient to select at least one cell from each row or column that is to be deleted.
Evenly Distribute Rows/Columns
|
Evenly distributing columns is available in the Premium Edition and Unlimited Edition 2020.3 or newer. Learn more. |
|
Evenly distributing rows is available in the Premium Edition and Unlimited Edition 2024.2 or newer. Learn more. |
This allows you to quickly make rows or columns the same size.
It depends on what is selected in the table. If you select a single cell (the text cursor blinks inside the cell), the rows or columns will be distributed evenly over the whole table height or width. If you select multiple cells, they will be distributed evenly over their added height or width.
To do this, click on the respective toobar button:
|
Evenly distribute rows |
|
Evenly distribute columns |
Table Properties
For the table item the following properties are available in the property editor:
Rows: |
Set the number of table rows. New rows will be inserted at the bottom. If you decrease the row count, the rows will be removed from the bottom up. This will also delete any content of the deleted cells. |
Columns: |
Set the number of table columns. New columns will be inserted at the right. If you decrese the column count, the columns will be removed from the right. This will also delete any content of the deleted cells. |
Padding: |
Adjust how large the distance between cell border and cell content should be. Enter edit mode to adjust the padding. The setting will be applied to all selected cells. Remember that padding may influence some text formatting settings. E.g. a centered text will not be completely centered when the left and right padding differ. |
Top: |
Set the distance of the cell content from the upper cell border. |
Right: |
Set the distance of the cell content from the right cell border. |
Bottom: |
Set the distance of the cell content from the bottom cell border. |
Left: |
Set the distance of the cell content from the left cell border. |
|
Hint: To center text in a cell or apply other formatting use the Text Formatting Toolbar above the worksheet. |
Old Table
The old table item can still be part of worksheets created with Worksheet Crafter versions prior to 2024.2. You can still work with them, but their functionality is limited.
Old table items have a hint in the table toolbar and the property editor to avoid confusing them with the new table.
If you are missing a feature in an old table item, you might want to try creating a new one from the item toolbar. The new table has more features and works better than the old one. Also it will be maintained in the future.
For the old table the number of rows or colums is set in the property editor.
The column width can be changed by dragging the column borders with the mouse. The height is not manually adjustable. It depends on the cell content in the row.
To edit the table text double click into the desired cell. You will see the text cursor and may now start typing. To jump to the next cell use the tabulator key. Select multiple cells with the mouse to change their formatting at once.
When you are editing the table a toolbar is shown. This toolbar allows you to change the frame and background color for the current cell or the currently selected cells. Set the line color and line thickness and apply to the desired border sections in relation to your selection. Use the lower right toolbar button to change the background color.
|
Inserting or deleting rows or columns is available in the Premium Edition and Unlimited Edition 2018.2 or newer. Learn more. |
The toolbar offers additional commands for deleting or inserting rows or columns. Hover over the button and wait a moment to show an explanatory tooltip.
|
Evenly distributing columns is available in the Premium Edition and Unlimited Edition 2020.3 or newer. Learn more. |
|
Distributes all columns of the table evenly over the table width. This allows you to quickly make all columns the same width. |

