Worksheet Crafter User Manual
|
Like the speech bubble you can also use the thought cloud as a simple way of mixing up your worksheets. To minimize the adjustment to this feature it works similar to the already familiar text box. |
Creating a New Thought Cloud
|
Use the toolbar icon pictured on the left to place a new thought cloud on the worksheet. For more information about this topic see the chapter "Creating Items".
|
Editing the Text of a Thought Cloud
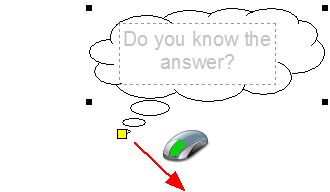
Each thought cloud contains a small text box which is displayed as a dotted gray line. Double-click this box to edit and format the content of the text box. For more information about using text boxes refer to the correspondent chapter of this manual.
Moving the Tip of the Thought Cloud
When you select a thought cloud the tip will be shown as a yellow cube. Press and hold the left mouse button to move this yellow cube and to change the reference point of the thought cloud.
Note: To show the reference point when you're within the text box of a thought cloud you first must exit the text box by pressing ESC |
|
Thought Cloud Properties
You can select the following settings for the thought cloud in the Property Editor:
Use whole item for text: |
Worksheet Crafter usually aligns the text box exactly to the thought cloud. This ensures that the text doesn't exceed the lines. If you check this property you can also use the complete box for your text. |
Fill background: |
Fills the background of the speech bubble with white color. Check this property if you want to place the speech bubble on top of an image. |


