Worksheet Crafter User Manual
|
In Worksheet Crafter you can easily add frames and text boxes that are usually needed for worksheets.
The modular method of creating these items particularly aims at worksheets. This for example means that you can add a points column to your worksheet with just one click.
In this chapter the method for creating a custom page frame is described in detail.
|
Switching to the Page Frame Mode
|
In order to edit the page frame you first need to switch to the page frame mode. Click "Edit Page Frame" in the "File" menu. You can also click the page frame icon on the upper toolbar |
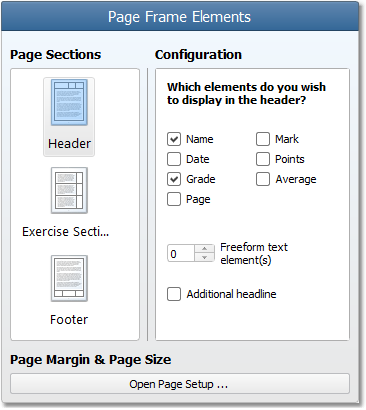
When you switch to the page frame mode a new sidebar will be displayed on the right hand side. Here you can select the following settings:
The Page Frame Elements
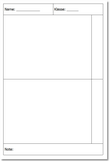
The page frame of a worksheet consists of three sections: Header, exercise sections and footer. You can activate and view individual elements in each of these sections in order to configure your page frame.
|
Header:
For the header individual elements such as "Name" and "Date" can be displayed. When you check one of these elements a header with the corresponding element will be added to your worksheet.
Apart from the free text elements all elements are provided with a default text (e.g. "Name: "). You can however edit the text after adding the element. Just double-click the corresponding element on the worksheet.
Footer:
The method for configuring the footer is similar to the configuration of the header - however, the number of elements differs. The footer text can also be subsequently edited on the worksheet.
Exercise Sections:
The exercise sections are placed in the area between header and footer. By default this area is filled with only one exercise section. You can however increase the number of exercise sections to divide the worksheet in several sections.
You can't write directly in exercise sections. Instead you need to add any kinds of text and exercise fields.
Distinctive features are the "points column" and the "total points cell" which can be activated for the exercise sections. The points column can optionally be added to the right of exercise sections. When you also activate the "total points cell" the points column extends to the footer.
|
Moving Lines
All lines of the page frame can be moved on the worksheet. Move the mouse over the line you want to move, press and hold the left mouse button, and move the line to the desired position. If you want to move the mouse by pixel additionally press and hold ALT when moving the line.
Moving Elements
You can always change the order of elements between header and footer. Click and drag the element to the desired position on the worksheet. Please note that elements can only be moved within one line.
Setting the Visibility of Lines
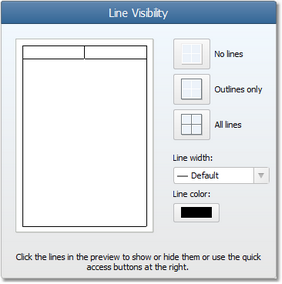
By default all page frame lines are visible on the worksheet. With the settings for "line visibility" you can however show or hide individual lines or all of the lines.
To hide a single line click the desired line in the page frame preview. Click a hidden line again to show it. The thickness and color of the line can be configured with the buttons on the right hand side.
Instead of hiding single lines you can use the quick select buttons on the right hand side to show or hide all of the lines with one click.
Default Font
At the lower edge of the sidebar you can edit the page frame elements' default font as well as the font size. The text of all new elements will be displayed with the selected font.
Applying the Page Frame to All Pages
If your document covers multiple pages then you will find a new command called "Apply this configuration to all pages" at the bottom of the page frame configuration. Use this command to apply your current page frame configuration to all pages with a single click.
|
|
Exiting the Page Frame Mode
To exit the page frame mode click the big "Exit Page Frame Mode" button at the right upper edge of the sidebar.


